I got inspired by Pinterest a while ago to build a playground for my daughter where she could play and have fun.
I decided to have the playground next to the patio, so I can be near by when she's playing and don't have to go through the mud, if it is raining.
The location itself determined the size of the playground - aligned to the end of the patio and a concrete pad - 16.5' x 9'.
I spent a lot of time researching and deciding on the playground surface. I was looking for a cheap and tidy solution. I really wanted to have one of those rubbery shock-absorbent surfaces used in parks but they were really expensive. Mulch was not a good idea, as well, as it tends to spread around easily. Then i thought about having a deck but I wanted the playground to be on the same level as the patio and getting the materials from the store home would have been really challenging as I have a small car. So, I settled for artificial grass.
I waited for the rainy season so the ground is soft and easy to work with. I live in California, where we are having another dry year. Luckily, it rained a couple of days in January and it was enough to get the project going. I asked for an estimate but was not happy with the numbers, so I told myself - "Well, shouldn't be that difficult. I'll do it myself". There was a long weekend coming (Martin Luther King) and I had nothing better to do. The first step was the easiest. I simply tilled the ground.

In my mind, it started looking like a really nice playground already. My plan was to excavate about 2" of soil, add base, sand, shock-absorbent pad, and grass. How difficult can it be? I started removing the dirt and I spread it around the backyard to feel in any holes or uneven areas. It took me a couple of days as I could work only while my daughter was sleeping.

Yay, I was getting there. I started looking for the shock-absorbent pad so I can see its exact depth and make sure I've dug deep enough. After some additional research, I opted out of the pad, as well. It was expensive and it would take about a week to be delivered. I decided to buy small pads only for the areas I'll need - around the slide, swing, etc. This decision came with a price - now, I have dug too deep. I have removed a little over of 2" and I needed to remove only 1.5". I had to put some of the dirt back. Grrr... Well, probably the obvious and easier decision was to buy more material but again I have a small car which meant many trips to the store and back. So, I bit the bullet and returned the dirt.

I guess, this was the most difficult part. Next, I put a weed barrier and got ready for the base.

I ended up using 16 bags of paver's base. It took me two trips to Home Depot and each time I got 8 bags as I didn't want to damage my car suspensions. I hurried up to spread the base and tamp it before the next rain.

It rained and we got almost an inch of precipitation. I am not sure if the rain helped or not, I chose to believe it did. The next day was sunny and I got the sand - two trips to the store for a total of 14 all-purpose sand bags (six + eight). I ended up using only 13 bags. The sand that I got is coarser, I think they call it sharp sand. HomeDepot sells as a multi-purpose sand in 60-lbs bags - gosh, those are heavy. I am ready for the grass.

The grass arrived in the morning the following day. I have purchased two rolls 13.2' x 6.5' each. During the night some animals (rabbits or cats) have dug in the sand, so i had to even it out again but that took a few minutes.

I laid out the rolls. I have planned to have as less seams as possible, a total of 4. Cutting the turf was a little bit challenging as my utility knife wasn't sharp enough and I figured it out a little bit too late. After I changed the blade, the cutting was much easier.
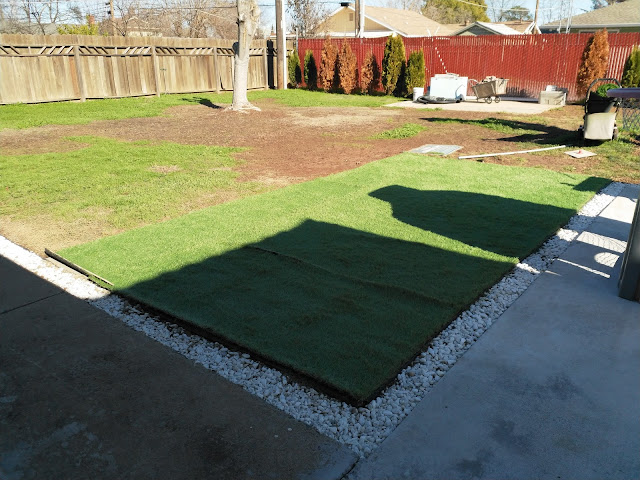
I am attaching another picture which shows the seams.

I made sure there was not a significant turf movement when i walked on it. I lifted up the turf and leveled out the sand (adding or removing) until I was satisfied. I used staples to position the turf in place. I couldn't find an adhesive tape for synthetic turf so I bought a double width duct tape and used staples to keep it in place. Time will tell.

I was not trilled with my work. If you look closely, you can see where the seams are. Luckily, there will be a playhouse, a slide, and other toys, so they won't be as visible.
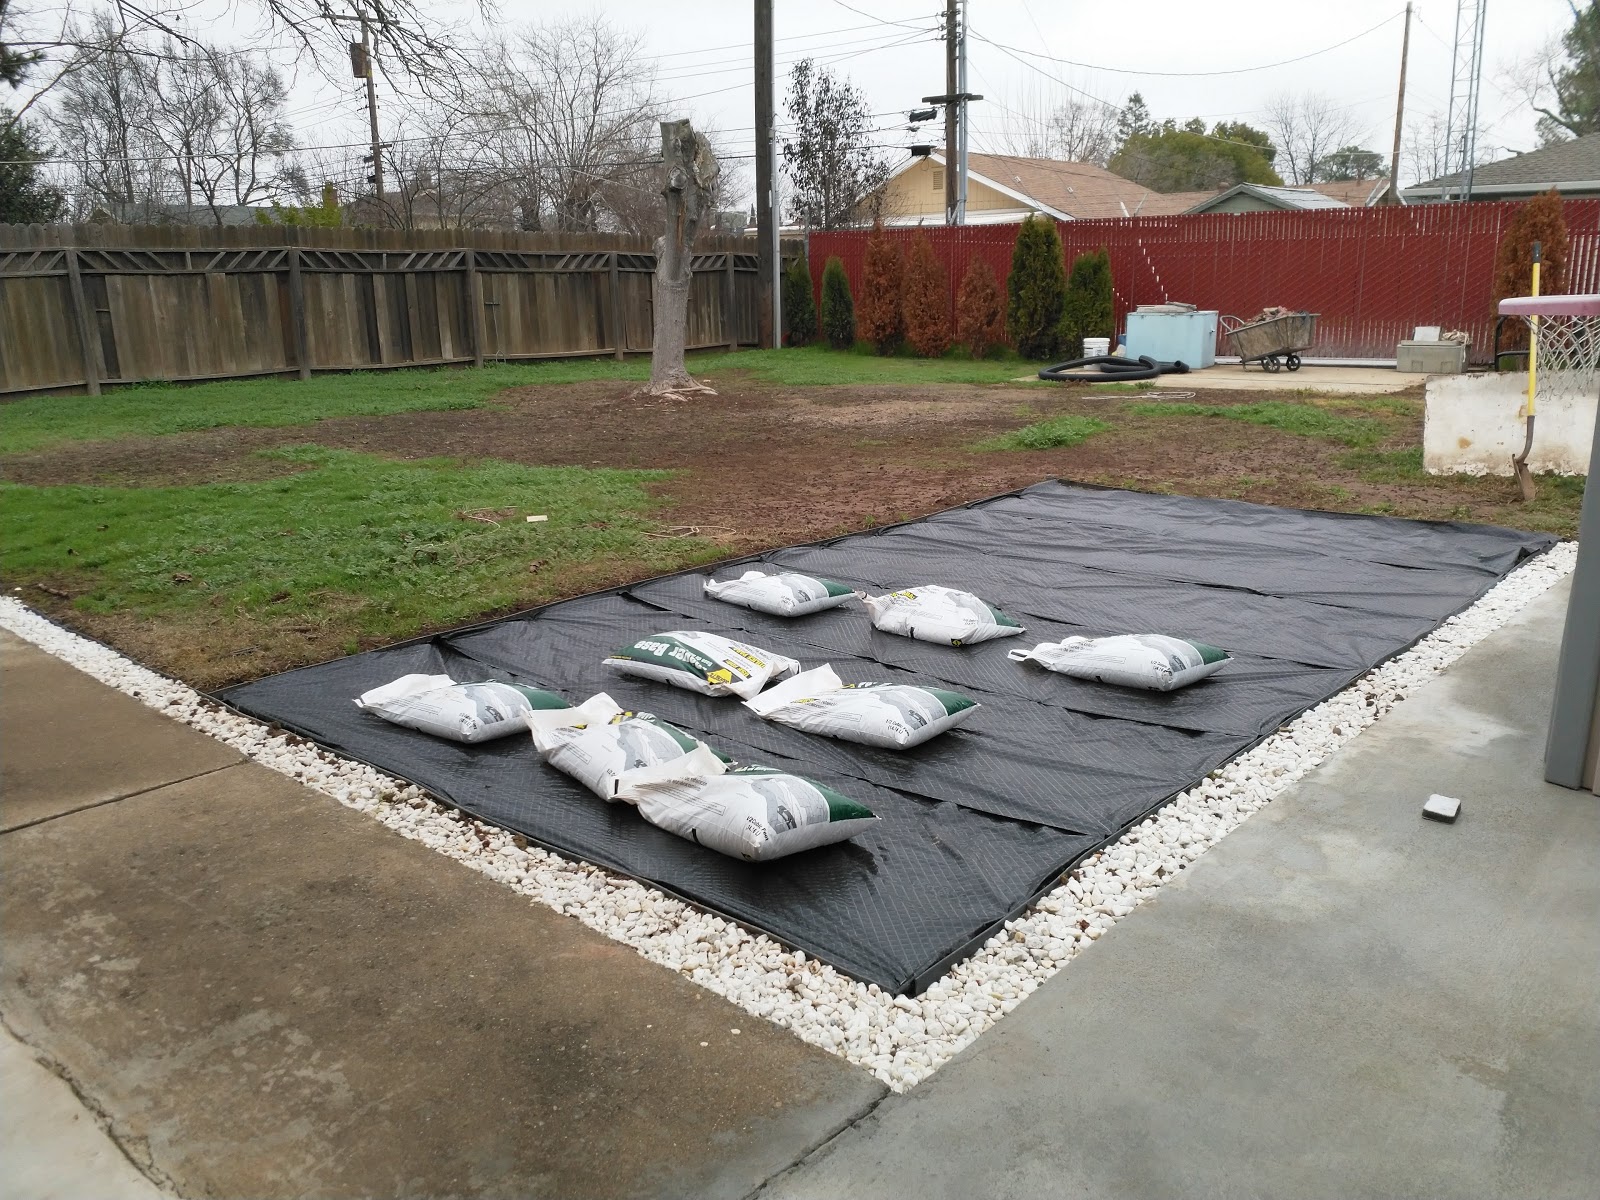
Then I applied a layer of kids safe infill. I bought only 75 lbs for my 150 sqf playground. The recommendation is 1-2 lbs of infill per sq. f. Somewhere I read that 1/2 lbs is sufficient. I decided to be cheap and try with 1/2 lbs/sqf and if not enough to buy more. I spread the infill manually.

After that I brushed the infill in, soaked it with some water, and added some plastic edging.

I was not happy with the results. The blades still looked flat. I should have bought more infill. I decided to leave this for the near future. This process requires for the grass to be dry and another rain was expected the same evening. I moved the playhouse and slide and this is what it turned out to be.

I noticed that there are some patches of infill that were still close to the surface and pressing the blades down. I got down on my knees and combed through the blades with my hands. I redistributed the patches of infill and suddenly the grass looks much better and the seems are almost unnoticeable.

I have used the following materials:
1) Vigoro 60 ft. No-Dig Landscape Edging Kit - $39.98
2) Vigoro Anchoring Spike Pack - $6.97
3) Vigoro 3 ft. x 100 ft. Polyethylene Weed Barrier Landscape Fabric - $21.98
4) 2 x Vigoro Landscape Fabric Staples (75-Pack) - $19.96
5) 16 x SAKRETE .5 cu. ft. Step 1 Patio Paver Base - $50.72
6) 13 x SAKRETE 60 lb. Multi-Purpose Sand - $46.15
7) 2 x Pet Zen Garden Premium Artificial Grass Patch w/ Drainage Holes & Rubber Backing (13.2 x 6.5) - $332.80
8) Gorilla 2.88 in. x 30 yds. Tough and Wide Tape - $14.97
9) 3 x Artificial Grass Infill 25 lbs. Buckets - $22.97
10) Vigoro 1 ft. x 10 in. Plastic Adirondack Decorative Border Lawn Edging - $59.70
The total I spent for materials is around $700 including taxes (wow!). I guess I will have to spend another $100 for additional infill and edging. Quite a project.
I hope my daughter enjoys it and have a wonderful time and memories in this little sanctuary of hers!
 I got inspired by Pinterest a while ago to build a playground for my daughter where she could play and have fun.
I decided to have the playground next to the patio, so I can be near by when she's playing and don't have to go through the mud, if it is raining.
The location itself determined the size of the playground - aligned to the end of the patio and a concrete pad - 16.5' x 9'.
I got inspired by Pinterest a while ago to build a playground for my daughter where she could play and have fun.
I decided to have the playground next to the patio, so I can be near by when she's playing and don't have to go through the mud, if it is raining.
The location itself determined the size of the playground - aligned to the end of the patio and a concrete pad - 16.5' x 9'.I spent a lot of time researching and deciding on the playground surface. I was looking for a cheap and tidy solution. I really wanted to have one of those rubbery shock-absorbent surfaces used in parks but they were really expensive. Mulch was not a good idea, as well, as it tends to spread around easily. Then i thought about having a deck but I wanted the playground to be on the same level as the patio and getting the materials from the store home would have been really challenging as I have a small car. So, I settled for artificial grass.
I waited for the rainy season so the ground is soft and easy to work with. I live in California, where we are having another dry year. Luckily, it rained a couple of days in January and it was enough to get the project going. I asked for an estimate but was not happy with the numbers, so I told myself - "Well, shouldn't be that difficult. I'll do it myself". There was a long weekend coming (Martin Luther King) and I had nothing better to do. The first step was the easiest. I simply tilled the ground.

In my mind, it started looking like a really nice playground already. My plan was to excavate about 2" of soil, add base, sand, shock-absorbent pad, and grass. How difficult can it be? I started removing the dirt and I spread it around the backyard to feel in any holes or uneven areas. It took me a couple of days as I could work only while my daughter was sleeping.

Yay, I was getting there. I started looking for the shock-absorbent pad so I can see its exact depth and make sure I've dug deep enough. After some additional research, I opted out of the pad, as well. It was expensive and it would take about a week to be delivered. I decided to buy small pads only for the areas I'll need - around the slide, swing, etc. This decision came with a price - now, I have dug too deep. I have removed a little over of 2" and I needed to remove only 1.5". I had to put some of the dirt back. Grrr... Well, probably the obvious and easier decision was to buy more material but again I have a small car which meant many trips to the store and back. So, I bit the bullet and returned the dirt.

I guess, this was the most difficult part. Next, I put a weed barrier and got ready for the base.
I ended up using 16 bags of paver's base. It took me two trips to Home Depot and each time I got 8 bags as I didn't want to damage my car suspensions. I hurried up to spread the base and tamp it before the next rain.

It rained and we got almost an inch of precipitation. I am not sure if the rain helped or not, I chose to believe it did. The next day was sunny and I got the sand - two trips to the store for a total of 14 all-purpose sand bags (six + eight). I ended up using only 13 bags. The sand that I got is coarser, I think they call it sharp sand. HomeDepot sells as a multi-purpose sand in 60-lbs bags - gosh, those are heavy. I am ready for the grass.

The grass arrived in the morning the following day. I have purchased two rolls 13.2' x 6.5' each. During the night some animals (rabbits or cats) have dug in the sand, so i had to even it out again but that took a few minutes.

I laid out the rolls. I have planned to have as less seams as possible, a total of 4. Cutting the turf was a little bit challenging as my utility knife wasn't sharp enough and I figured it out a little bit too late. After I changed the blade, the cutting was much easier.

I am attaching another picture which shows the seams.

I made sure there was not a significant turf movement when i walked on it. I lifted up the turf and leveled out the sand (adding or removing) until I was satisfied. I used staples to position the turf in place. I couldn't find an adhesive tape for synthetic turf so I bought a double width duct tape and used staples to keep it in place. Time will tell.

I was not trilled with my work. If you look closely, you can see where the seams are. Luckily, there will be a playhouse, a slide, and other toys, so they won't be as visible.
Then I applied a layer of kids safe infill. I bought only 75 lbs for my 150 sqf playground. The recommendation is 1-2 lbs of infill per sq. f. Somewhere I read that 1/2 lbs is sufficient. I decided to be cheap and try with 1/2 lbs/sqf and if not enough to buy more. I spread the infill manually.

After that I brushed the infill in, soaked it with some water, and added some plastic edging.

I was not happy with the results. The blades still looked flat. I should have bought more infill. I decided to leave this for the near future. This process requires for the grass to be dry and another rain was expected the same evening. I moved the playhouse and slide and this is what it turned out to be.

I noticed that there are some patches of infill that were still close to the surface and pressing the blades down. I got down on my knees and combed through the blades with my hands. I redistributed the patches of infill and suddenly the grass looks much better and the seems are almost unnoticeable.

I have used the following materials:
1) Vigoro 60 ft. No-Dig Landscape Edging Kit - $39.98
2) Vigoro Anchoring Spike Pack - $6.97
3) Vigoro 3 ft. x 100 ft. Polyethylene Weed Barrier Landscape Fabric - $21.98
4) 2 x Vigoro Landscape Fabric Staples (75-Pack) - $19.96
5) 16 x SAKRETE .5 cu. ft. Step 1 Patio Paver Base - $50.72
6) 13 x SAKRETE 60 lb. Multi-Purpose Sand - $46.15
7) 2 x Pet Zen Garden Premium Artificial Grass Patch w/ Drainage Holes & Rubber Backing (13.2 x 6.5) - $332.80
8) Gorilla 2.88 in. x 30 yds. Tough and Wide Tape - $14.97
9) 3 x Artificial Grass Infill 25 lbs. Buckets - $22.97
10) Vigoro 1 ft. x 10 in. Plastic Adirondack Decorative Border Lawn Edging - $59.70
The total I spent for materials is around $700 including taxes (wow!). I guess I will have to spend another $100 for additional infill and edging. Quite a project.
I hope my daughter enjoys it and have a wonderful time and memories in this little sanctuary of hers!
Comments
Post a Comment